Create Objects
To create objects click and drag the mouse or click somewhere where there isn't an object. Clicking on an object will display its information.
A description of the objects on the left Create sidebar are as follows:
- Wall: Provides boundaries to the room.
- Gate: Acts as a doorway, either between rooms, or to the outside world (called a destination gate, which will be shown as red, not blue).
- (H) Barricade: Acts as a standalone wall within the room that does not need to be connected to any other walls/barricades.
- (L) Barricade: Same as a high barricade, but it is a lower height, giving increased visibility (important for pedestrian behaviour).
- Counter: Placed the same as a gate, however with no restrictions (can be placed in the middle of a room). Counts the number of avatars that pass through in any direction. Can count the same avatar multiple times if it walked back through. Does not have any affect on the environment or simulation.
- Prefab: Choose a ready-made room and a size, then click in the environment to place it. Press Up/Down Arrow while placing to rotate it 90°.
Adding Walls by Coordinates
On large sites, it can be easier to enter wall positions than to draw them. Click Add Walls by Coordinates in the Create tab to open the Add Walls using Coordinates dialog. Walls are created on the currently selected level, so select the level you want before adding walls.
To add one wall at a time:
- Enter the start point (X1, Y1) and end point (X2, Y2) in metres.
- Optionally enter a Width. If you leave it blank, the default is 0.5 m.
- Tick Barricade, Low or Transparent if needed.
- Click Add. The dialog stays open so you can add the next wall.
To add many walls at once, click Import CSV and select a .csv file. Each row is one wall, in this format:
x1,y1,x2,y2,width
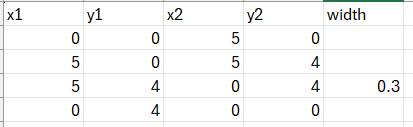
The width is optional. A header row, blank lines and lines starting with # are ignored. Walls that already exist in the same position are skipped, and a summary of how many walls were created and skipped is shown when the import finishes.
Wall Textures
Click on a wall and click Add Texture to apply an image (jpg or png) to it. The texture is saved inside the model file, so you don’t need to keep the original image.
Created with the Personal Edition of HelpNDoc: Effortlessly upgrade your WinHelp HLP help files to CHM with HelpNDoc